AU Class
AU Class
class - AU

Web app development with Autodesk Forge Data Exchange and AWS Amplify

このクラスを共有
ビデオ、プレゼンテーション スライド、配布資料のキーワードを検索する:

説明

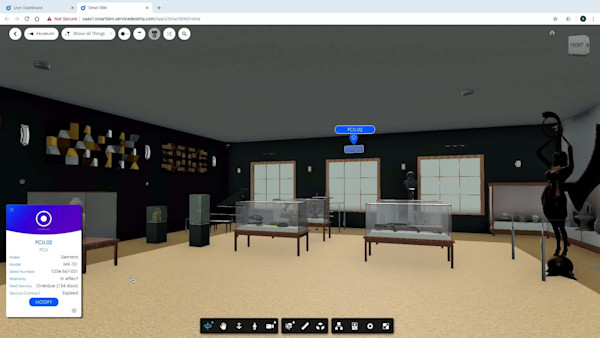
Learn how to combine Autodesk Forge and AWS services to easily create a web application. This class will dive deep into the use cases for Autodesk Forge Data exchange and show how to export subsets of data from a Revit model. This data will then be joined with IoT data from typical building sensors and displayed in a web application built using the AWS Amplify service, which makes it easy to create a web app.

主な学習内容

  • Understand the use of Autodesk Forge Data Exchange
  • Identify new use cases for Autodesk Forge Data Exchange
  • Build an application using AWS and Autodesk Forge
  • Integrate disparate data into a single application

スピーカー

  • Thomas Jones さんのアバター
    Thomas Jones
    Tom “Elvis” Jones is a Solutions Architect with Amazon Web Services who spends his time focusing on the complex challenges of our most strategic partners in the the Design, Engineering, and Manufacturing space. His career has spanned both the hardware and software sides of the house, including work at Red Hat, Transmeta, and Pratt & Whitney, giving Tom an extremely broad technical experience across multiple industries and verticals. He is a whitepaper author, a patent holder, a training material builder, a DevOps expert, an active Maker, a mountain biker, and above all, a passionate technologist. He has been known to go far out of his way for pinball and fondly recalls playing "Adventure" on an ADDS Viewpoint ASCII terminal.
  • Jon Clark
    I am a Sr. Partner Solutions Architect with AWS focused on helping partners and customers benefit from AWS services.
Video Player is loading.
Current Time 0:00
Duration 28:40
Loaded: 0.00%
Stream Type LIVE
Remaining Time 28:40
 
1x
  • Chapters
  • descriptions off, selected
  • en (Main), selected
Transcript

JOHN CLARK: Hello and welcome to our presentation. Thank you so much for taking the time today to learn about how to develop a mobile app with the new Forge Data Exchange and AWS Amplify. I am John Clark, senior partner solutions architect with AWS, and with me today is Enrico Chionna, BIM technology manager, also with AWS.

The key learning objectives we will cover today are understand the use of Autodesk Forge Data Exchange, integrate disparate data into a single application, build an application using AWS and Autodesk Forge, identify new use cases for Autodesk Forge Data Exchange.

Just a quick look at what will be demoing today is, this is a web application. In the main screen we have our Forge Viewer, which we'll be looking at a model of Revit. It's actually a data exchange from Revit.

On the left, we have a data exchange panel, which will list data exchanges that we'll be adding to our application. And on the right, we have a list of IoT devices, which will list IoT devices that have been mapped to our model. And in the center we have a device stats dialogue, which comes up when you click on an IoT device, which you can use to look at the status of any IoT device in real time.

Other components of the demo include dialogues for things like log in, log out, adding new models, adding new IoT devices, and Autodesk authentication, which we will also demonstrate. Next, I'll cover what is Autodesk Data Exchange and how does data exchange work with Forge API?

Forge Data Exchange enables you to share only the portions of your data that you need to share. It works with Autodesk 2023, Revit 2023, and Adventure 2023. Data Exchange is a new capability released by Autodesk in April of this year. Data Exchanges are built on the Forge Data platform, which means a lot of the same API features that are available through the Forge API are also available through the Data Exchange API.

In addition, data exchange works as a data layer in the saved file, which enables data to be exchanged between Autodesk and non-Autodesk applications. As an example, a typical Data Exchange workflow might start with Revit. A Revit file is stored in Autodesk Docs, which is part of Autodesk Construction Cloud. Here we can create data exchanges of the Revit model. Since Data Exchange is part of the Forge API we can reference information in the data exchange and consume it in our third party app.

In this case, we're using AWS Amplify to build our app around the Autodesk Data Exchange. With AWS Amplify you can build full stack web and mobile applications. Before we dive into the AWS Amplify and build our web application, let's get a full picture of what is AWS. AWS is essentially the most flexible and secure cloud and computing environment that gives you the most flexibility and security. Let me break that down into six categories.

Security. At AWS security is priority number one and supports 98 security standards and compliance certifications, and when you run on AWS you run in a shared security model where AWS takes care of security of the cloud and you take care of security in the cloud enabling you to put more emphasis on securing your sensitive data.

Cost optimized. No need to use capital expense on local hardware. Pay only for what you use. With having optimized security and optimized costs, AWS gives you the ability to innovate more quickly and more frequently than ever before. Plus, AWS is elastic. The system automatically scales up or down resources depending on the workload demands in real time.

You also have more flexibility with access to 200 or more AWS services supporting virtually any cloud workload or use case. Lastly, you can deploy your applications globally in seconds. Quickly and easily deploying your apps across 26 geos around the world, including 84 availability zones all running AWS's own multiple redundant fiber optic network.

Now, let's take a look at what AWS Amplify is. AWS Amplify provides tools to build, ship, and scale your app. Build is where you can quickly create and configure the back end of your app. Connect to the back end and to the front and the UI front end. Ship allows you to deploy your application in a matter of seconds and scale enables you to extend use cases with direct access to 175 or more features of the AWS CDK, which is the cloud development kit. For this discussion, we will mostly focus on the build aspect of our demo, but we will touch on all of these concepts as we dive into our demonstration.

For the build phase of the developing our Amplify app you create the back end using any combination of the Amplify CLI, Amplify Studio, and Amplify Libraries. Also, listed here are a number of features categories, which you can combine to support virtually any use case imaginable, such as analytics to create graphs and charts, predictions using machine learning, publish and subscribe, notification mechanisms, custom functions, and for the development of our demo, we are using authentication, graph GL API, and PubSub. We will demonstrate these shortly. AWS Amplify also supports a number of industry standard languages and libraries such as JavaScript, React, Next.js, Android, iOS, among others, as you can see here.

Now, let's discuss developing the back end of our AWS Amplify app. As mentioned, there are three aspects to building an app. You have a visual dev environment, Amplify Studio, a full dev ops stack, Amplify CLI, and access to 175 plus AWS resources, as we mentioned. With Amplify Studio you can configure the back end of your application visually from the AWS console. There you can model your data with GraphGL API and DynamoDB tables manage, manage user groups and file storage, and set up authentication.

A second way to develop the back end of your application is with the Amplify CLI, which again, is a full dev ops stack. With Amplify CLI you can model your data, manage users groups, set up authentication, everything we just discussed with Amplify Studio. In addition, with Amplify CLI you can transform your scheme definitions to GraphGL API and DynamoDB tables automatically. And it automatically generates back end code for Swift, Java and JavaScript, which you can easily consume. We will demonstrate these two important features of Amplify CLI.

For the UI development of AWS Amplify app we used a few components such as the Autodesk Forge Viewer, which is a WebGL-based JavaScript library for our 3D, and can also be 2D, data exchanges. The Forge Viewer works with a number of Autodesk applications such as AutoCAD, Fusion 360 and Revit, which we will demonstrate. It also is compatible with all modern browsers.

For the UI of our application, meet Cloudscape, which you can find at Cloudscape.design. You may notice the look and feel of the Cloudscape components to be familiar. This is because cloud scape was developed by AWS in 2016 and is still used today across many web applications owned by AWS and is now freely available as an open source design system. Also note that the AWS continues to enhance the system based on customer feedback.

For the design of our application, Cloudscape makes it very easy to add components and produce a consistent look and feel across the application. These are the main components we implemented for application such as app layout, top navigation, side navigation, help panel and others. Now that we have a good understanding of the three aspects to building an app with AWS Amplify, let's take a look at a simple use case for a demonstration.

You're an architect and you have designed this amazing school building. You design the building in Revit and manage the Revit files in Autodesk Construction Cloud. Now that the beautiful school building is built, the building manager is familiar with AWS Amplify has an idea to map the IoT enabled lights throughout the building and create a web app to visualize the location and status of each light in the building.

The building manager contacts the architect and asks, may I have a copy of the 3D design of the building so that I can map my IoT lights? The architect replies, well, I'm not able to provide the entire model due to its size and potential proprietary information, but I can provide a new feature from Autodesk called Data Exchange. Would that work? The building manager replies, absolutely. Yes. That will work perfectly for my app because I'm able to reference information in the Data Exchange through the Forge API.

So the architect creates a Data Exchange of the Revit model containing only the information the building manager needs. The URL of the Data Exchange is passed to the building manager. The URL is then entered into the web app where it is parsed and then Forge Viewer displays the Data Exchange in the web application. Now, Enrico will walk you through a quick demo of the app to give you some context as we discuss the details of the implementation following this quick demo.

ENRICO CHIONNA: Thank you, John. So we already built a web application that does this and we are going to show you how the end product looks like in this quick 3 minute video. So first, we're signing in the AWS application with email and password. Then we authenticate with Autodesk in order to access our data exchanges and models that are on ACC and BIM 360.

Now that we're back in our main application, we can select any model to view it in the Forge Viewer. From here, we can expand the device menu on the right to list all the IoT devices. In this case, lighting fixtures that have been mapped to our model.

Clicking on a device will open up a pop up showing that device statistics for the last 14 days. To add a new model, the user can click on a button and paste an invite URL from ACC. This will fetch the latest version of that model and add it to the app. We can now view the newly added model in the viewer, as well.

Because this model does not have any IoT devices mapped yet, we can map a series of new devices to specific model elements in the Forge Viewer. In this instance, we are mapping three different exterior lights. Every time a new device is added it's automatically reflected in the device list, as well as it's in the viewer.

The application should now be able to display real time device status updates. Now, to simulate this we can navigate to the app sync service in the AWS console. And after logging in as the user, we can trigger a mutation that changes the device status. In this case, we are changing the device status to off.

We can try again and this time, we change it to malfunction and we see that both the viewer and the device list are updated. Finally, when we are done working we can sign out and exit the application.

In this section, we will dive deeper into setting up a back end and integrating the back end with your React app. We will create a web app with a GraphQL API that stores and retrieves items in a cloud database. In addition, we'll demonstrate how to authenticate users, communicate with our API, and integrate with Forge. To design our app, we started from a wireframe mockup and then we went to a high fidelity version using Cloudscape design system.

For the front end our application will leverage react components from two different libraries. In red is the Amplify Authenticator. This component comes from the AWS UI library, which wraps the entire React app and protects it with its fully automated authentication flow. In blue are the components that use the Cloudscape design system library. These are components like the main app, top navigation, the app layout components. They are nested within each other and make up the entire application and set the feel and look of our app.

The way our application will interact with the Forge platform is via three different APIs. The Authentication API will be used to generate a 3-leg access token and authorize our app to act on behalf of the user. The viewer is then used to load and display a rigged model in our application and the Data Management API is used to retrieve the latest version of a model from BIM 360 or ACC.

The overall app architecture and development will work just like this. On one side, we have our users who interact with the client application while on the other side, we have developers. The developers install and configure the Amplify CLI, which initializes a new project and the can service in the AWS cloud. A new React app is then created and we set up Amplify in the front end. New AWS services are then gradually added via the Amplify CLI.

We will start with Amazon Cognito to manage our users, and then we will add a GraphQL API using AWS app sync, and create a database with DynamoDB. We then integrate the Forge API and then we go live with our application. For this, we will need to host and deploy the application using Amplify, which uses CloudFront and S3. We will perform this step at a later time.

Before we begin developing our application we need to make sure that we have the following installed. We need Node.js, Npm, and Git installed on our machine. If you don't already have an AWS account, you'll need to create one. There are no upfront charges or any term commitments and signing up gives you immediate access to the AWS free tier. We'll also need an Autodesk account, this is to access models on ACC, and a Forge account to access the API.

Five are the steps needed to create an Amplify project. First, we will need to install the Amplify CLI. Then we will configure Amplify. We will start a new React application. We'll initialize the Amplify project. And finally, we will set up Amplify in the front end.

Let's take a look at how the code looks like. So first, we will install and configure the Amplify CLI. With these two lines of code the CLI will guide you through the process of creating a new IM user that will be used by the Amplify CLI to add AWS services.

To set up the project, we'll first need to create a new React app using these three lines of code. And the result should look something like this. Now that we have running front end react up, it's time to set up Amplify back end with this one line of code. So we just run Amplify in it and then Amplify will prompt you for the name and a few other configuration settings. You can accept the defaults.

When you initialize a new Amplify project using the Amplify CLI, Amplify generates all this code for you. This is the back end of your application. This includes the Amplify back end definition. It also includes an aws-export.js that holds the configuration for the back end services. And lastly, it modifies the gitignore file, adding some generic files to the ignore list. Once again, this code is all generated for you by Amplify.

At the same time, a cloud project is created for you in the Amplify Console. In this case, we can access by running the command amplify console in the command line. The console provides a list of back end environments, deep links to provision resources for Amplify category, status of recent deployments and instructions on how to promote, clone, pool, and delete back end resources.

Our last step is to connect Amplify to our front end React app. This allows the client to interact with our backend services. All we need are these three lines of code and you can add them to your index file in your source directory. Here, we are importing Amplify and the AWS export and we use them to configure Amplify in our frontend. Once this connection is complete, future backend updates are automatically reflected through this setup.

Now that our React app is setup and Amplify's initialized, we are ready to add a new service such as Authentication and GraphQL API, as well as Forge in the next step. So next, we need to install the Amplify UI package. We'll use this library for our main app Authentication UI component.

We also need to install the following packages from Cloudscape. The global stats package will give our app a nice look thanks to its CSS. The components package contains all the React components to build our app user interface. And finally, the design tokens to apply Cloudscape styles to the Amplify UI component.

So to add authentication to our app the Amplify framework uses Amazon Cognito to create a fully automated authentication flow. This means that with a few lines of code we will have a professional web application capable of signing in, signing up, password recovery, and even email verification when a user registers. As a result of adding authentication, this is our web app now. Pretty awesome, right?

So let's see how it's done. To add Authentication, we simply ran amplify add auth in the command line. We then follow the prompts and choose email as our preferred sign in method. We then run the amplify push command, which deploys the code to our back end. And now the authentication service has been deployed and you can start using it. To view the deployed services in your project at any time you can go to your amplify console by running the amplify console command.

This will open up the console. Once we are in the AWS Console, our Amplify dev environment will look something like this. As you can see, our authentication services have been deployed. Now, if you switch to Cognito we see that there is a newly created user pool to manage all our users. If we take a look at the signing experience tab at the bottom, email is set as our sign in method just like we specified earlier in the command line.

Here, I'm showing you how we can add the fully automated authentication flow to our app in under three lines of code using the authentication component. We just need to import the Authenticator component from Amplify UI React package. Then input also, styles.CSS. We then wrapped the app function with the authenticator component and we're done.

The authenticator works seamlessly with the Amplify CLI to automatically work with your backend so no extra configuration is needed here. If we take a look at the application, now we should see how we went from the React app to our authenticated component. Now, the authenticator component is getting a React application and is ready to go.

One more step before we move on. Now that we have a fully automated authentication flow, we want to customize its look to match our brand and app identity. Since we are using Cloudscape as our primary design system, we want to apply the same primary color from Cloudscape to the Amplify UI component. To do so, we can create a custom theme object where we specify that the amplify primary color should be equal to the Cloudscape primary color. To do this, we are leveraging design tokens, which luckily both libraries use.

Finally, we need to pass the new theme object to the Amplify UI theme provider component, which wraps our main app component. This will apply the custom theme to all Amplify UI component. The final look of our authenticator is this, as you can see all primary colors, including the top font, the bottom background, and the forgot your password link. Match or react out primary color.

Now, let's move on to adding GraphQL API using Amplify. Now, throughout this next feature Amplify uses AWS app sync to create a GraphQL API and Amazon DynamoDB to create a NoSQL database. We'll see how to fetch models, create new ones, and subscribe to real time updates.

For this section, we only need four steps to set up a new API. First we create the API, then we edit its schema, we deploy the API, and then we connect it to the front end. So once again, just one line of code to create the API by running amplify add api and following the Amplify CLI prompts we can create these new services. We then select GraphQL and we give it a name. Finally, remember to say yes to edit the API schema now.

Once again, Amplify is doing the heavy lifting for you here and it's generating all the backend code. In this example, it created a dedicated API folder and updated the backend-config.json file. Now, Amplify also opened up the schema.graphql file for you. In order to set up our data scheme, we modified the template schema provided by Amplify to have two types, models and devices where one model can have many devices associated to it. With the @model directive, the CLI will scaffold out the necessary database in dynamioDB, the schema for crud and list operations, and the GraphQL resolvers needed to make everything work together.

The @ off directive allows you to set custom authorization rules. The @ has many since the one to many relationship between models and devices. Finally, at the bottom we created a custom subscription to receive real time updates for every time a device is updated. To deploy this app to the backend. Sorry, to deploy his API to the back end, we run the push command. Now, with the API live we can start interacting with it.

Once again, Amplify is generating more code for you and this time Amplify has generated all these code just for us. Let's take a look at what looks inside. You'll see here that the code generated by Amplify includes operations for creating, reading, updating, deleting, and listing models and devices, and even the code for subscribing to real time updates.

This is an example of how easy it is to call this API from our front end. The first code shows how you can get a list of all our models with only three lines of code. Use this to populate our list of models in the UI. The second code shows how we can fetch a list of devices that belong to a specific model. After a user has selected one, in this case, we are passing a model idea as a filter.

We use these to populate the device list in our application. Similarly with three lines of code we can create a new model record in our database. We use this when the user adds a new model via the dedicated button. We then do the same thing again when the user adds a new device using the device button.

Finally, we've registered a subscription from the client to listen to real time device state changes. We use these to update both our device lists and the viewer. To integrate Forge with our client we will be using its Authentication API and the Data Management API. so after logging into the Amplify app up, need to send the user to the desk authorization web flow using the three lag token with implicit grant. After the user signs in with Autodesk is then redirected back to our application with a URL that contains the access token. We need these access tokens to make any subsequent API calls to Forge.

To add a new model to the app the user needs to paste the Data Exchange URL that was shared by the architect. We then extract the projectID and entityID parameters from the URL and with this info, and then the axis token we can call the Data Management API to retrieve the latest version of that model as well as its name. This is a sample API response from Forge after getting the deep latest version of an item on ACC.

Then, to add the Model Viewer we leverage the Forge Viewer API and the Data Visualization Extension, which is used to overlay sprites representing IoT devices. This link points you to the Forge data visualization library that contains step by step instructions on how to implement the viewer in your application and show IoT devices using the extension.

If you are wondering how much this app costs, well, let's find out together. We have divided costs between producer of models and direct exchanges, AKA the architect, and the consumer, or the vendor. From the other side the architect will incurring cost associated with Revit and ASC licensing to design in Revit and to host the models in the OS Construction Cloud. No Forge costs here.

For the vendor there is no need to use Reddit, so no costs on the Revit side. They don't need a license because they can just access the project if they're invited to it and they will need to sign up for Forge. However, the four APIs that we have used in our app do not have any costs associated with it. So it should be free. From the AWS side, only the vendor will need an AWS account. The services used by this app are managed by AWS Amplify. However, when you use the amplified framework you pay only for the underlying AWS services you use or based on your free tier. There are no additional charges for using the Amplify framework.

And these are lists of useful resources for you to consult ranging from Autodesk Forge, to AWS Amplify, Cloudscape, and if you want to sign up for a free tier with AWS. This concludes our presentation. Thank you very much for your attention.

______
icon-svg-close-thick

Cookieの設定

弊社にとって、お客様のプライバシーを守ることと最適な体験を提供することは、どちらも大変重要です。弊社では、お客様に合わせてカスタマイズした情報を提供し、並びにアプリケーションの開発に役立てることを目的に、本サイトのご利用方法についてのデータを収集しております。

そこで、お客様のデータの収集と使用を許可いただけるかどうかをお答えください。

弊社が利用しているサードパーティのサービスについての説明とプライバシー ステートメントも、併せてご確認ください。

サイト動作に必須:オートデスクのサイトが正常に動作し、お客様へサービスを提供するために必要な機能です

Cookie を有効にすることで、お客様の好みやログイン情報が記録され、このデータに基づき操作に対する応答や、ショッピング カートへの商品追加が最適化されます。

使用感が向上:お客様に最適な情報が表示されます

Cookie を有効にすることで、拡張機能が正常に動作し、サイト表示が個々に合わせてカスタマイズされます。お客様に最適な情報をお届けし、使用感を向上させるためのこうした設定は、オードデスクまたはサードパーティのサービス プロバイダーが行います。 Cookie が無効に設定されている場合、一部またはすべてのサービスをご利用いただけない場合があります。

広告表示をカスタマイズ:お客様に関連する広告が表示されます

Cookie を有効にすることで、サイトのご利用内容やご興味に関するデータが収集され、これに基づきお客様に関連する広告が表示されるなど、効率的な動作が可能になります。また、継続的にデータを収集することで、お客様のご興味にさらに関連する広告を配信することが可能になります。Cookie が無効に設定されている場合、お客様に関連しない広告が表示される可能性があります。

icon-svg-close-thick

サードパーティのサービス

それぞれの情報で弊社が利用しているサードパーティのサービスと、オンラインで収集するお客様のデータの使用方法を詳しく説明いたします。

icon-svg-hide-thick

icon-svg-show-thick

サイト動作に必須:オートデスクのサイトが正常に動作し、お客様へサービスを提供するために必要な機能です

Qualtrics
弊社はQualtricsを利用し、アンケート調査やオンライン フォームを通じてお客様が弊社にフィードバックを提供できるようにしています。アンケートの回答は無作為に選んだお客様にお願いしておりますが、お客様から自発的に弊社にフィードバックを提供することも可能です。データを収集する目的は、アンケートの回答前にお客様がとられた行動を、より正しく理解するためです。収集したデータは、発生していた可能性がある問題のトラブルシューティングに役立てさせていただきます。. Qualtrics プライバシー ポリシー
Akamai mPulse
弊社は、弊社サイトでのお客様の行動に関するデータを収集するために、Akamai mPulseを利用しています。収集する情報には、お客様がアクセスしたページ、ご利用中の体験版、再生したビデオ、購入した製品やサービス、お客様の IP アドレスまたはデバイスの ID、お客様の Autodesk ID が含まれます。このデータを基にサイトのパフォーマンスを測定したり、オンラインでの操作のしやすさを検証して機能強化に役立てています。併せて高度な解析手法を使用し、メールでのお問い合わせやカスタマー サポート、営業へのお問い合わせで、お客様に最適な体験が提供されるようにしています。. Akamai mPulse プライバシー ポリシー
Digital River
弊社は、弊社サイトでのお客様の行動に関するデータを収集するために、Digital Riverを利用しています。収集する情報には、お客様がアクセスしたページ、ご利用中の体験版、再生したビデオ、購入した製品やサービス、お客様の IP アドレスまたはデバイスの ID、お客様の Autodesk ID が含まれます。このデータを基にサイトのパフォーマンスを測定したり、オンラインでの操作のしやすさを検証して機能強化に役立てています。併せて高度な解析手法を使用し、メールでのお問い合わせやカスタマー サポート、営業へのお問い合わせで、お客様に最適な体験が提供されるようにしています。. Digital River プライバシー ポリシー
Dynatrace
弊社は、弊社サイトでのお客様の行動に関するデータを収集するために、Dynatraceを利用しています。収集する情報には、お客様がアクセスしたページ、ご利用中の体験版、再生したビデオ、購入した製品やサービス、お客様の IP アドレスまたはデバイスの ID、お客様の Autodesk ID が含まれます。このデータを基にサイトのパフォーマンスを測定したり、オンラインでの操作のしやすさを検証して機能強化に役立てています。併せて高度な解析手法を使用し、メールでのお問い合わせやカスタマー サポート、営業へのお問い合わせで、お客様に最適な体験が提供されるようにしています。. Dynatrace プライバシー ポリシー
Khoros
弊社は、弊社サイトでのお客様の行動に関するデータを収集するために、Khorosを利用しています。収集する情報には、お客様がアクセスしたページ、ご利用中の体験版、再生したビデオ、購入した製品やサービス、お客様の IP アドレスまたはデバイスの ID、お客様の Autodesk ID が含まれます。このデータを基にサイトのパフォーマンスを測定したり、オンラインでの操作のしやすさを検証して機能強化に役立てています。併せて高度な解析手法を使用し、メールでのお問い合わせやカスタマー サポート、営業へのお問い合わせで、お客様に最適な体験が提供されるようにしています。. Khoros プライバシー ポリシー
Launch Darkly
弊社は、弊社サイトでのお客様の行動に関するデータを収集するために、Launch Darklyを利用しています。収集する情報には、お客様がアクセスしたページ、ご利用中の体験版、再生したビデオ、購入した製品やサービス、お客様の IP アドレスまたはデバイスの ID、お客様の Autodesk ID が含まれます。このデータを基にサイトのパフォーマンスを測定したり、オンラインでの操作のしやすさを検証して機能強化に役立てています。併せて高度な解析手法を使用し、メールでのお問い合わせやカスタマー サポート、営業へのお問い合わせで、お客様に最適な体験が提供されるようにしています。. Launch Darkly プライバシー ポリシー
New Relic
弊社は、弊社サイトでのお客様の行動に関するデータを収集するために、New Relicを利用しています。収集する情報には、お客様がアクセスしたページ、ご利用中の体験版、再生したビデオ、購入した製品やサービス、お客様の IP アドレスまたはデバイスの ID、お客様の Autodesk ID が含まれます。このデータを基にサイトのパフォーマンスを測定したり、オンラインでの操作のしやすさを検証して機能強化に役立てています。併せて高度な解析手法を使用し、メールでのお問い合わせやカスタマー サポート、営業へのお問い合わせで、お客様に最適な体験が提供されるようにしています。. New Relic プライバシー ポリシー
Salesforce Live Agent
弊社は、弊社サイトでのお客様の行動に関するデータを収集するために、Salesforce Live Agentを利用しています。収集する情報には、お客様がアクセスしたページ、ご利用中の体験版、再生したビデオ、購入した製品やサービス、お客様の IP アドレスまたはデバイスの ID、お客様の Autodesk ID が含まれます。このデータを基にサイトのパフォーマンスを測定したり、オンラインでの操作のしやすさを検証して機能強化に役立てています。併せて高度な解析手法を使用し、メールでのお問い合わせやカスタマー サポート、営業へのお問い合わせで、お客様に最適な体験が提供されるようにしています。. Salesforce Live Agent プライバシー ポリシー
Wistia
弊社は、弊社サイトでのお客様の行動に関するデータを収集するために、Wistiaを利用しています。収集する情報には、お客様がアクセスしたページ、ご利用中の体験版、再生したビデオ、購入した製品やサービス、お客様の IP アドレスまたはデバイスの ID、お客様の Autodesk ID が含まれます。このデータを基にサイトのパフォーマンスを測定したり、オンラインでの操作のしやすさを検証して機能強化に役立てています。併せて高度な解析手法を使用し、メールでのお問い合わせやカスタマー サポート、営業へのお問い合わせで、お客様に最適な体験が提供されるようにしています。. Wistia プライバシー ポリシー
Tealium
弊社は、弊社サイトでのお客様の行動に関するデータを収集するために、Tealiumを利用しています。データには、お客様がアクセスしたページ、ご利用中の体験版、再生したビデオ、購入した製品やサービス、お客様の IP アドレスまたはデバイスの ID が含まれます。このデータを基にサイトのパフォーマンスを測定したり、オンラインでの操作のしやすさを検証して機能強化に役立てています。併せて高度な解析手法を使用し、メールでのお問い合わせやカスタマー サポート、営業へのお問い合わせで、お客様に最適な体験が提供されるようにしています。. Tealium プライバシー ポリシー<>
Typepad Stats
弊社は、弊社サイトでのお客様の行動に関するデータを収集するために、Typepad Statsを利用しています。収集する情報には、お客様がアクセスしたページ、ご利用中の体験版、再生したビデオ、購入した製品やサービス、お客様の IP アドレスまたはデバイスの ID、お客様の Autodesk ID が含まれます。このデータを基にサイトのパフォーマンスを測定したり、オンラインでの操作のしやすさを検証して機能強化に役立てています。併せて高度な解析手法を使用し、メールでのお問い合わせやカスタマー サポート、営業へのお問い合わせで、お客様に最適な体験が提供されるようにしています。. Typepad Stats プライバシー ポリシー
Geo Targetly
当社では、Geo Targetly を使用して Web サイトの訪問者を最適な Web ページに誘導し、訪問者のいる場所に応じて調整したコンテンツを提供します。Geo Targetly は、Web サイト訪問者の IP アドレスを使用して、訪問者のデバイスのおおよその位置を特定します。このため、訪問者は (ほとんどの場合) 自分のローカル言語でコンテンツを閲覧できます。Geo Targetly プライバシー ポリシー
SpeedCurve
弊社は、SpeedCurve を使用して、Web ページの読み込み時間と画像、スクリプト、テキストなど後続の要素の応答性を計測することにより、お客様の Web サイト エクスペリエンスのパフォーマンスをモニタリングおよび計測します。SpeedCurve プライバシー ポリシー
Qualified
Qualified is the Autodesk Live Chat agent platform. This platform provides services to allow our customers to communicate in real-time with Autodesk support. We may collect unique ID for specific browser sessions during a chat. Qualified Privacy Policy

icon-svg-hide-thick

icon-svg-show-thick

使用感が向上:お客様に最適な情報が表示されます

Google Optimize
弊社はGoogle Optimizeを利用して、弊社サイトの新機能をテストし、お客様に合わせた方法で機能を使えるようにしています。そのため弊社では、弊社サイトにアクセスしているお客様から、行動に関するデータを収集しています。収集するデータには、お客様がアクセスしたページ、ご利用中の体験版、再生したビデオ、購入した製品やサービス、お客様の IP アドレスまたはデバイスの ID、お客様の Autodesk ID などが含まれます。機能のテストの結果によっては、お客様がご利用のサイトのバージョンが変わったり、サイトにアクセスするユーザの属性に応じて、パーソナライズされたコンテンツが表示されるようになる場合があります。. Google Optimize プライバシー ポリシー
ClickTale
弊社は、弊社サイトをご利用になるお客様が、どこで操作につまづいたかを正しく理解できるよう、ClickTaleを利用しています。弊社ではセッションの記録を基に、ページの要素を含めて、お客様がサイトでどのような操作を行っているかを確認しています。お客様の特定につながる個人情報は非表示にし、収集も行いません。. ClickTale プライバシー ポリシー
OneSignal
弊社は、OneSignalがサポートするサイトに広告を配置するために、OneSignalを利用しています。広告には、OneSignalのデータと、弊社サイトにアクセスしているお客様から弊社が収集する行動に関するデータの両方が使われます。弊社が収集するデータには、お客様がアクセスしたページ、ご利用中の体験版、再生したビデオ、購入した製品やサービス、お客様の IP アドレスまたはデバイスの ID が含まれます。この情報に併せて、OneSignalがお客様から収集したデータを使用する場合があります。OneSignalに提供しているデータを弊社が使用するのは、お客様のデジタル広告体験をより適切にカスタマイズし、関連性の高い広告をお客様に配信するためです。. OneSignal プライバシー ポリシー
Optimizely
弊社はOptimizelyを利用して、弊社サイトの新機能をテストし、お客様に合わせた方法で機能を使えるようにしています。そのため弊社では、弊社サイトにアクセスしているお客様から、行動に関するデータを収集しています。収集するデータには、お客様がアクセスしたページ、ご利用中の体験版、再生したビデオ、購入した製品やサービス、お客様の IP アドレスまたはデバイスの ID、お客様の Autodesk ID などが含まれます。機能のテストの結果によっては、お客様がご利用のサイトのバージョンが変わったり、サイトにアクセスするユーザの属性に応じて、パーソナライズされたコンテンツが表示されるようになる場合があります。. Optimizely プライバシー ポリシー
Amplitude
弊社はAmplitudeを利用して、弊社サイトの新機能をテストし、お客様に合わせた方法で機能を使えるようにしています。そのため弊社では、弊社サイトにアクセスしているお客様から、行動に関するデータを収集しています。収集するデータには、お客様がアクセスしたページ、ご利用中の体験版、再生したビデオ、購入した製品やサービス、お客様の IP アドレスまたはデバイスの ID、お客様の Autodesk ID などが含まれます。機能のテストの結果によっては、お客様がご利用のサイトのバージョンが変わったり、サイトにアクセスするユーザの属性に応じて、パーソナライズされたコンテンツが表示されるようになる場合があります。. Amplitude プライバシー ポリシー
Snowplow
弊社は、弊社サイトでのお客様の行動に関するデータを収集するために、Snowplowを利用しています。収集する情報には、お客様がアクセスしたページ、ご利用中の体験版、再生したビデオ、購入した製品やサービス、お客様の IP アドレスまたはデバイスの ID、お客様の Autodesk ID が含まれます。このデータを基にサイトのパフォーマンスを測定したり、オンラインでの操作のしやすさを検証して機能強化に役立てています。併せて高度な解析手法を使用し、メールでのお問い合わせやカスタマー サポート、営業へのお問い合わせで、お客様に最適な体験が提供されるようにしています。. Snowplow プライバシー ポリシー
UserVoice
弊社は、弊社サイトでのお客様の行動に関するデータを収集するために、UserVoiceを利用しています。収集する情報には、お客様がアクセスしたページ、ご利用中の体験版、再生したビデオ、購入した製品やサービス、お客様の IP アドレスまたはデバイスの ID、お客様の Autodesk ID が含まれます。このデータを基にサイトのパフォーマンスを測定したり、オンラインでの操作のしやすさを検証して機能強化に役立てています。併せて高度な解析手法を使用し、メールでのお問い合わせやカスタマー サポート、営業へのお問い合わせで、お客様に最適な体験が提供されるようにしています。. UserVoice プライバシー ポリシー
Clearbit
Clearbit を使用すると、リアルタイムのデータ強化により、お客様に合わせてパーソナライズされた適切なエクスペリエンスを提供できます。弊社が収集するデータには、お客様がアクセスしたページ、ご利用中の体験版、再生したビデオ、購入した製品やサービス、お客様の IP アドレスまたはデバイスの ID が含まれます。Clearbit プライバシー ポリシー
YouTube
YouTube はビデオ共有プラットフォームで、埋め込まれたビデオを当社のウェブ サイトで表示および共有することができます。YouTube は、視聴者のビデオのパフォーマンスの測定値を提供しています。 YouTube 社のプライバシー ポリシー

icon-svg-hide-thick

icon-svg-show-thick

広告表示をカスタマイズ:お客様に関連する広告が表示されます

Adobe Analytics
弊社は、弊社サイトでのお客様の行動に関するデータを収集するために、Adobe Analyticsを利用しています。収集する情報には、お客様がアクセスしたページ、ご利用中の体験版、再生したビデオ、購入した製品やサービス、お客様の IP アドレスまたはデバイスの ID、お客様の Autodesk ID が含まれます。このデータを基にサイトのパフォーマンスを測定したり、オンラインでの操作のしやすさを検証して機能強化に役立てています。併せて高度な解析手法を使用し、メールでのお問い合わせやカスタマー サポート、営業へのお問い合わせで、お客様に最適な体験が提供されるようにしています。. Adobe Analytics プライバシー ポリシー
Google Analytics (Web Analytics)
弊社は、弊社サイトでのお客様の行動に関するデータを収集するために、Google Analytics (Web Analytics)を利用しています。データには、お客様がアクセスしたページ、ご利用中の体験版、再生したビデオ、購入した製品やサービス、お客様の IP アドレスまたはデバイスの ID が含まれます。このデータを基にサイトのパフォーマンスを測定したり、オンラインでの操作のしやすさを検証して機能強化に役立てています。併せて高度な解析手法を使用し、メールでのお問い合わせやカスタマー サポート、営業へのお問い合わせで、お客様に最適な体験が提供されるようにしています。. Google Analytics (Web Analytics) プライバシー ポリシー<>
Marketo
弊社は、お客様に関連性のあるコンテンツを、適切なタイミングにメールで配信できるよう、Marketoを利用しています。そのため、お客様のオンラインでの行動や、弊社からお送りするメールへの反応について、データを収集しています。収集するデータには、お客様がアクセスしたページ、ご利用中の体験版、再生したビデオ、購入した製品やサービス、お客様の IP アドレスまたはデバイスの ID、メールの開封率、クリックしたリンクなどが含まれます。このデータに、他の収集先から集めたデータを組み合わせ、営業やカスタマー サービスへの満足度を向上させるとともに、高度な解析処理によって、より関連性の高いコンテンツを提供するようにしています。. Marketo プライバシー ポリシー
Doubleclick
弊社は、Doubleclickがサポートするサイトに広告を配置するために、Doubleclickを利用しています。広告には、Doubleclickのデータと、弊社サイトにアクセスしているお客様から弊社が収集する行動に関するデータの両方が使われます。弊社が収集するデータには、お客様がアクセスしたページ、ご利用中の体験版、再生したビデオ、購入した製品やサービス、お客様の IP アドレスまたはデバイスの ID が含まれます。この情報に併せて、Doubleclickがお客様から収集したデータを使用する場合があります。Doubleclickに提供しているデータを弊社が使用するのは、お客様のデジタル広告体験をより適切にカスタマイズし、関連性の高い広告をお客様に配信するためです。. Doubleclick プライバシー ポリシー
HubSpot
弊社は、お客様に関連性のあるコンテンツを、適切なタイミングにメールで配信できるよう、HubSpotを利用しています。そのため、お客様のオンラインでの行動や、弊社からお送りするメールへの反応について、データを収集しています。収集するデータには、お客様がアクセスしたページ、ご利用中の体験版、再生したビデオ、購入した製品やサービス、お客様の IP アドレスまたはデバイスの ID、メールの開封率、クリックしたリンクなどが含まれます。. HubSpot プライバシー ポリシー
Twitter
弊社は、Twitterがサポートするサイトに広告を配置するために、Twitterを利用しています。広告には、Twitterのデータと、弊社サイトにアクセスしているお客様から弊社が収集する行動に関するデータの両方が使われます。弊社が収集するデータには、お客様がアクセスしたページ、ご利用中の体験版、再生したビデオ、購入した製品やサービス、お客様の IP アドレスまたはデバイスの ID が含まれます。この情報に併せて、Twitterがお客様から収集したデータを使用する場合があります。Twitterに提供しているデータを弊社が使用するのは、お客様のデジタル広告体験をより適切にカスタマイズし、関連性の高い広告をお客様に配信するためです。. Twitter プライバシー ポリシー
Facebook
弊社は、Facebookがサポートするサイトに広告を配置するために、Facebookを利用しています。広告には、Facebookのデータと、弊社サイトにアクセスしているお客様から弊社が収集する行動に関するデータの両方が使われます。弊社が収集するデータには、お客様がアクセスしたページ、ご利用中の体験版、再生したビデオ、購入した製品やサービス、お客様の IP アドレスまたはデバイスの ID が含まれます。この情報に併せて、Facebookがお客様から収集したデータを使用する場合があります。Facebookに提供しているデータを弊社が使用するのは、お客様のデジタル広告体験をより適切にカスタマイズし、関連性の高い広告をお客様に配信するためです。. Facebook プライバシー ポリシー
LinkedIn
弊社は、LinkedInがサポートするサイトに広告を配置するために、LinkedInを利用しています。広告には、LinkedInのデータと、弊社サイトにアクセスしているお客様から弊社が収集する行動に関するデータの両方が使われます。弊社が収集するデータには、お客様がアクセスしたページ、ご利用中の体験版、再生したビデオ、購入した製品やサービス、お客様の IP アドレスまたはデバイスの ID が含まれます。この情報に併せて、LinkedInがお客様から収集したデータを使用する場合があります。LinkedInに提供しているデータを弊社が使用するのは、お客様のデジタル広告体験をより適切にカスタマイズし、関連性の高い広告をお客様に配信するためです。. LinkedIn プライバシー ポリシー
Yahoo! Japan
弊社は、Yahoo! Japanがサポートするサイトに広告を配置するために、Yahoo! Japanを利用しています。広告には、Yahoo! Japanのデータと、弊社サイトにアクセスしているお客様から弊社が収集する行動に関するデータの両方が使われます。弊社が収集するデータには、お客様がアクセスしたページ、ご利用中の体験版、再生したビデオ、購入した製品やサービス、お客様の IP アドレスまたはデバイスの ID が含まれます。この情報に併せて、Yahoo! Japanがお客様から収集したデータを使用する場合があります。Yahoo! Japanに提供しているデータを弊社が使用するのは、お客様のデジタル広告体験をより適切にカスタマイズし、関連性の高い広告をお客様に配信するためです。. Yahoo! Japan プライバシー ポリシー
Naver
弊社は、Naverがサポートするサイトに広告を配置するために、Naverを利用しています。広告には、Naverのデータと、弊社サイトにアクセスしているお客様から弊社が収集する行動に関するデータの両方が使われます。弊社が収集するデータには、お客様がアクセスしたページ、ご利用中の体験版、再生したビデオ、購入した製品やサービス、お客様の IP アドレスまたはデバイスの ID が含まれます。この情報に併せて、Naverがお客様から収集したデータを使用する場合があります。Naverに提供しているデータを弊社が使用するのは、お客様のデジタル広告体験をより適切にカスタマイズし、関連性の高い広告をお客様に配信するためです。. Naver プライバシー ポリシー
Quantcast
弊社は、Quantcastがサポートするサイトに広告を配置するために、Quantcastを利用しています。広告には、Quantcastのデータと、弊社サイトにアクセスしているお客様から弊社が収集する行動に関するデータの両方が使われます。弊社が収集するデータには、お客様がアクセスしたページ、ご利用中の体験版、再生したビデオ、購入した製品やサービス、お客様の IP アドレスまたはデバイスの ID が含まれます。この情報に併せて、Quantcastがお客様から収集したデータを使用する場合があります。Quantcastに提供しているデータを弊社が使用するのは、お客様のデジタル広告体験をより適切にカスタマイズし、関連性の高い広告をお客様に配信するためです。. Quantcast プライバシー ポリシー
Call Tracking
弊社は、キャンペーン用にカスタマイズした電話番号を提供するために、Call Trackingを利用しています。カスタマイズした電話番号を使用することで、お客様は弊社の担当者にすぐ連絡できるようになり、弊社はサービスのパフォーマンスをより正確に評価できるようになります。弊社では、提供した電話番号を基に、サイトでのお客様の行動に関するデータを収集する場合があります。. Call Tracking プライバシー ポリシー
Wunderkind
弊社は、Wunderkindがサポートするサイトに広告を配置するために、Wunderkindを利用しています。広告には、Wunderkindのデータと、弊社サイトにアクセスしているお客様から弊社が収集する行動に関するデータの両方が使われます。弊社が収集するデータには、お客様がアクセスしたページ、ご利用中の体験版、再生したビデオ、購入した製品やサービス、お客様の IP アドレスまたはデバイスの ID が含まれます。この情報に併せて、Wunderkindがお客様から収集したデータを使用する場合があります。Wunderkindに提供しているデータを弊社が使用するのは、お客様のデジタル広告体験をより適切にカスタマイズし、関連性の高い広告をお客様に配信するためです。. Wunderkind プライバシー ポリシー
ADC Media
弊社は、ADC Mediaがサポートするサイトに広告を配置するために、ADC Mediaを利用しています。広告には、ADC Mediaのデータと、弊社サイトにアクセスしているお客様から弊社が収集する行動に関するデータの両方が使われます。弊社が収集するデータには、お客様がアクセスしたページ、ご利用中の体験版、再生したビデオ、購入した製品やサービス、お客様の IP アドレスまたはデバイスの ID が含まれます。この情報に併せて、ADC Mediaがお客様から収集したデータを使用する場合があります。ADC Mediaに提供しているデータを弊社が使用するのは、お客様のデジタル広告体験をより適切にカスタマイズし、関連性の高い広告をお客様に配信するためです。. ADC Media プライバシー ポリシー
AgrantSEM
弊社は、AgrantSEMがサポートするサイトに広告を配置するために、AgrantSEMを利用しています。広告には、AgrantSEMのデータと、弊社サイトにアクセスしているお客様から弊社が収集する行動に関するデータの両方が使われます。弊社が収集するデータには、お客様がアクセスしたページ、ご利用中の体験版、再生したビデオ、購入した製品やサービス、お客様の IP アドレスまたはデバイスの ID が含まれます。この情報に併せて、AgrantSEMがお客様から収集したデータを使用する場合があります。AgrantSEMに提供しているデータを弊社が使用するのは、お客様のデジタル広告体験をより適切にカスタマイズし、関連性の高い広告をお客様に配信するためです。. AgrantSEM プライバシー ポリシー
Bidtellect
弊社は、Bidtellectがサポートするサイトに広告を配置するために、Bidtellectを利用しています。広告には、Bidtellectのデータと、弊社サイトにアクセスしているお客様から弊社が収集する行動に関するデータの両方が使われます。弊社が収集するデータには、お客様がアクセスしたページ、ご利用中の体験版、再生したビデオ、購入した製品やサービス、お客様の IP アドレスまたはデバイスの ID が含まれます。この情報に併せて、Bidtellectがお客様から収集したデータを使用する場合があります。Bidtellectに提供しているデータを弊社が使用するのは、お客様のデジタル広告体験をより適切にカスタマイズし、関連性の高い広告をお客様に配信するためです。. Bidtellect プライバシー ポリシー
Bing
弊社は、Bingがサポートするサイトに広告を配置するために、Bingを利用しています。広告には、Bingのデータと、弊社サイトにアクセスしているお客様から弊社が収集する行動に関するデータの両方が使われます。弊社が収集するデータには、お客様がアクセスしたページ、ご利用中の体験版、再生したビデオ、購入した製品やサービス、お客様の IP アドレスまたはデバイスの ID が含まれます。この情報に併せて、Bingがお客様から収集したデータを使用する場合があります。Bingに提供しているデータを弊社が使用するのは、お客様のデジタル広告体験をより適切にカスタマイズし、関連性の高い広告をお客様に配信するためです。. Bing プライバシー ポリシー
G2Crowd
弊社は、G2Crowdがサポートするサイトに広告を配置するために、G2Crowdを利用しています。広告には、G2Crowdのデータと、弊社サイトにアクセスしているお客様から弊社が収集する行動に関するデータの両方が使われます。弊社が収集するデータには、お客様がアクセスしたページ、ご利用中の体験版、再生したビデオ、購入した製品やサービス、お客様の IP アドレスまたはデバイスの ID が含まれます。この情報に併せて、G2Crowdがお客様から収集したデータを使用する場合があります。G2Crowdに提供しているデータを弊社が使用するのは、お客様のデジタル広告体験をより適切にカスタマイズし、関連性の高い広告をお客様に配信するためです。. G2Crowd プライバシー ポリシー
NMPI Display
弊社は、NMPI Displayがサポートするサイトに広告を配置するために、NMPI Displayを利用しています。広告には、NMPI Displayのデータと、弊社サイトにアクセスしているお客様から弊社が収集する行動に関するデータの両方が使われます。弊社が収集するデータには、お客様がアクセスしたページ、ご利用中の体験版、再生したビデオ、購入した製品やサービス、お客様の IP アドレスまたはデバイスの ID が含まれます。この情報に併せて、NMPI Displayがお客様から収集したデータを使用する場合があります。NMPI Displayに提供しているデータを弊社が使用するのは、お客様のデジタル広告体験をより適切にカスタマイズし、関連性の高い広告をお客様に配信するためです。. NMPI Display プライバシー ポリシー
VK
弊社は、VKがサポートするサイトに広告を配置するために、VKを利用しています。広告には、VKのデータと、弊社サイトにアクセスしているお客様から弊社が収集する行動に関するデータの両方が使われます。弊社が収集するデータには、お客様がアクセスしたページ、ご利用中の体験版、再生したビデオ、購入した製品やサービス、お客様の IP アドレスまたはデバイスの ID が含まれます。この情報に併せて、VKがお客様から収集したデータを使用する場合があります。VKに提供しているデータを弊社が使用するのは、お客様のデジタル広告体験をより適切にカスタマイズし、関連性の高い広告をお客様に配信するためです。. VK プライバシー ポリシー
Adobe Target
弊社はAdobe Targetを利用して、弊社サイトの新機能をテストし、お客様に合わせた方法で機能を使えるようにしています。そのため弊社では、弊社サイトにアクセスしているお客様から、行動に関するデータを収集しています。収集するデータには、お客様がアクセスしたページ、ご利用中の体験版、再生したビデオ、購入した製品やサービス、お客様の IP アドレスまたはデバイスの ID、お客様の Autodesk ID などが含まれます。機能のテストの結果によっては、お客様がご利用のサイトのバージョンが変わったり、サイトにアクセスするユーザの属性に応じて、パーソナライズされたコンテンツが表示されるようになる場合があります。. Adobe Target プライバシー ポリシー
Google Analytics (Advertising)
弊社は、Google Analytics (Advertising)がサポートするサイトに広告を配置するために、Google Analytics (Advertising)を利用しています。広告には、Google Analytics (Advertising)のデータと、弊社サイトにアクセスしているお客様から弊社が収集する行動に関するデータの両方が使われます。弊社が収集するデータには、お客様がアクセスしたページ、ご利用中の体験版、再生したビデオ、購入した製品やサービス、お客様の IP アドレスまたはデバイスの ID が含まれます。この情報に併せて、Google Analytics (Advertising)がお客様から収集したデータを使用する場合があります。Google Analytics (Advertising)に提供しているデータを弊社が使用するのは、お客様のデジタル広告体験をより適切にカスタマイズし、関連性の高い広告をお客様に配信するためです。. Google Analytics (Advertising) プライバシー ポリシー
Trendkite
弊社は、Trendkiteがサポートするサイトに広告を配置するために、Trendkiteを利用しています。広告には、Trendkiteのデータと、弊社サイトにアクセスしているお客様から弊社が収集する行動に関するデータの両方が使われます。弊社が収集するデータには、お客様がアクセスしたページ、ご利用中の体験版、再生したビデオ、購入した製品やサービス、お客様の IP アドレスまたはデバイスの ID が含まれます。この情報に併せて、Trendkiteがお客様から収集したデータを使用する場合があります。Trendkiteに提供しているデータを弊社が使用するのは、お客様のデジタル広告体験をより適切にカスタマイズし、関連性の高い広告をお客様に配信するためです。. Trendkite プライバシー ポリシー
Hotjar
弊社は、Hotjarがサポートするサイトに広告を配置するために、Hotjarを利用しています。広告には、Hotjarのデータと、弊社サイトにアクセスしているお客様から弊社が収集する行動に関するデータの両方が使われます。弊社が収集するデータには、お客様がアクセスしたページ、ご利用中の体験版、再生したビデオ、購入した製品やサービス、お客様の IP アドレスまたはデバイスの ID が含まれます。この情報に併せて、Hotjarがお客様から収集したデータを使用する場合があります。Hotjarに提供しているデータを弊社が使用するのは、お客様のデジタル広告体験をより適切にカスタマイズし、関連性の高い広告をお客様に配信するためです。. Hotjar プライバシー ポリシー
6 Sense
弊社は、6 Senseがサポートするサイトに広告を配置するために、6 Senseを利用しています。広告には、6 Senseのデータと、弊社サイトにアクセスしているお客様から弊社が収集する行動に関するデータの両方が使われます。弊社が収集するデータには、お客様がアクセスしたページ、ご利用中の体験版、再生したビデオ、購入した製品やサービス、お客様の IP アドレスまたはデバイスの ID が含まれます。この情報に併せて、6 Senseがお客様から収集したデータを使用する場合があります。6 Senseに提供しているデータを弊社が使用するのは、お客様のデジタル広告体験をより適切にカスタマイズし、関連性の高い広告をお客様に配信するためです。. 6 Sense プライバシー ポリシー
Terminus
弊社は、Terminusがサポートするサイトに広告を配置するために、Terminusを利用しています。広告には、Terminusのデータと、弊社サイトにアクセスしているお客様から弊社が収集する行動に関するデータの両方が使われます。弊社が収集するデータには、お客様がアクセスしたページ、ご利用中の体験版、再生したビデオ、購入した製品やサービス、お客様の IP アドレスまたはデバイスの ID が含まれます。この情報に併せて、Terminusがお客様から収集したデータを使用する場合があります。Terminusに提供しているデータを弊社が使用するのは、お客様のデジタル広告体験をより適切にカスタマイズし、関連性の高い広告をお客様に配信するためです。. Terminus プライバシー ポリシー
StackAdapt
弊社は、StackAdaptがサポートするサイトに広告を配置するために、StackAdaptを利用しています。広告には、StackAdaptのデータと、弊社サイトにアクセスしているお客様から弊社が収集する行動に関するデータの両方が使われます。弊社が収集するデータには、お客様がアクセスしたページ、ご利用中の体験版、再生したビデオ、購入した製品やサービス、お客様の IP アドレスまたはデバイスの ID が含まれます。この情報に併せて、StackAdaptがお客様から収集したデータを使用する場合があります。StackAdaptに提供しているデータを弊社が使用するのは、お客様のデジタル広告体験をより適切にカスタマイズし、関連性の高い広告をお客様に配信するためです。. StackAdapt プライバシー ポリシー
The Trade Desk
弊社は、The Trade Deskがサポートするサイトに広告を配置するために、The Trade Deskを利用しています。広告には、The Trade Deskのデータと、弊社サイトにアクセスしているお客様から弊社が収集する行動に関するデータの両方が使われます。弊社が収集するデータには、お客様がアクセスしたページ、ご利用中の体験版、再生したビデオ、購入した製品やサービス、お客様の IP アドレスまたはデバイスの ID が含まれます。この情報に併せて、The Trade Deskがお客様から収集したデータを使用する場合があります。The Trade Deskに提供しているデータを弊社が使用するのは、お客様のデジタル広告体験をより適切にカスタマイズし、関連性の高い広告をお客様に配信するためです。. The Trade Desk プライバシー ポリシー
RollWorks
We use RollWorks to deploy digital advertising on sites supported by RollWorks. Ads are based on both RollWorks data and behavioral data that we collect while you’re on our sites. The data we collect may include pages you’ve visited, trials you’ve initiated, videos you’ve played, purchases you’ve made, and your IP address or device ID. This information may be combined with data that RollWorks has collected from you. We use the data that we provide to RollWorks to better customize your digital advertising experience and present you with more relevant ads. RollWorks Privacy Policy

オンライン体験の品質向上にぜひご協力ください

オートデスクは、弊社の製品やサービスをご利用いただくお客様に、優れた体験を提供することを目指しています。これまでの画面の各項目で[はい]を選択したお客様については、弊社でデータを収集し、カスタマイズされた体験の提供とアプリケーションの品質向上に役立てさせていただきます。この設定は、プライバシー ステートメントにアクセスすると、いつでも変更できます。

お客様の顧客体験は、お客様が自由に決められます。

オートデスクはお客様のプライバシーを尊重します。オートデスクでは収集したデータを基に、お客様が弊社製品をどのように利用されているのか、お客様が関心を示しそうな情報は何か、オートデスクとの関係をより価値あるものにするには、どのような改善が可能かを理解するよう務めています。

そこで、お客様一人ひとりに合わせた体験を提供するために、お客様のデータを収集し、使用することを許可いただけるかどうかお答えください。

体験をカスタマイズすることのメリットにつきましては、本サイトのプライバシー設定の管理でご確認いただけます。弊社のプライバシー ステートメントでも、選択肢について詳しく説明しております。