& Construction

Integrated BIM tools, including Revit, AutoCAD, and Civil 3D
& Manufacturing

Professional CAD/CAM tools built on Inventor and AutoCAD

Integrated BIM tools, including Revit, AutoCAD, and Civil 3D

Professional CAD/CAM tools built on Inventor and AutoCAD
Set up time options for a steady state analysis.
Type:
Tutorial
Length:
4 min.
Tutorial resources
These downloadable resources will be used to complete this tutorial:
Transcript
00:04
With info Water pro,
00:05
you can run steady state simulations on a new model project
00:09
to take a snapshot in time before going more in depth.
00:14
Specifically steady state simulations capture the results for a
00:17
single time step with no variance in modeling outputs.
00:22
This allows you to see a snapshot in time of the system
00:25
which is helpful when you later perform in extended period simulation.
00:29
S
00:30
where you add in temporal variation to your model elements.
00:34
Some common examples of steady state simulations
00:37
are peak hour and firef flow scenarios.
00:41
These snapshots can provide information on demands,
00:44
pumping data and tank elevations
00:49
to begin double click the desired project dot APR file to open
00:54
Agis Pro.
00:56
Once the project starts,
00:57
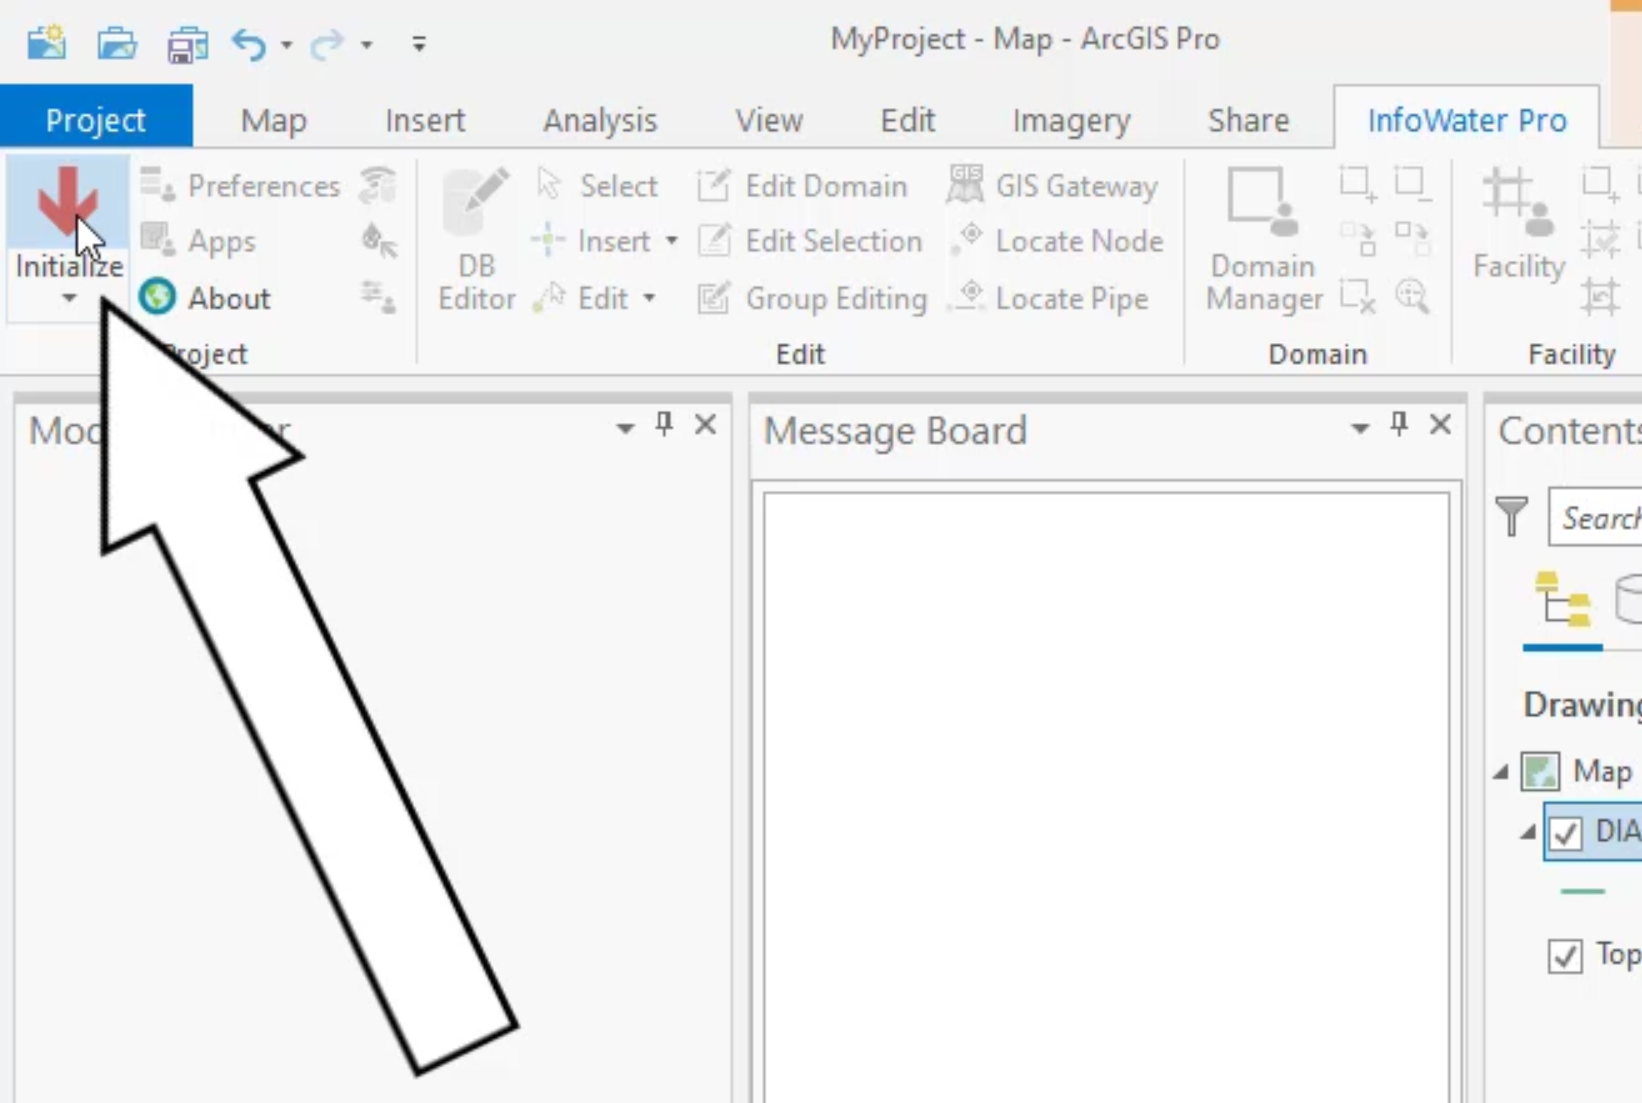
click the info Water pro tab to open the info Water pro ribbon
01:02
in the project panel. Click initialize
01:07
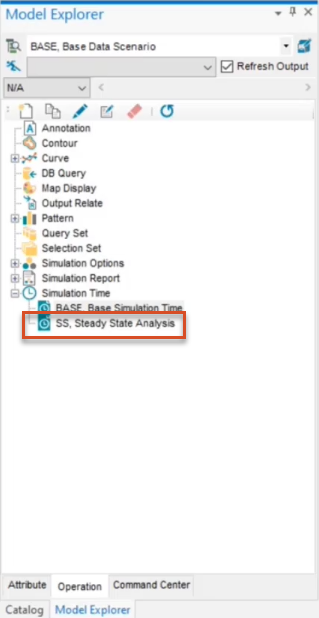
in the model explorer switch to the operation tab.
01:11
The operation tab contains many modeling
01:13
parameters and other useful information,
01:17
expand simulation time and then double click base base simulation time
01:23
in the simulation time dialog box from the toolbar, click new
01:28
and then enter the new ID name as SS comma steady state
01:32
analysis.
01:34
Click OK.
01:36
Verify that the steady state checkbox is enabled and then click. OK. Again
01:42
note that you can also open the simulation time
01:44
dialogue from the run manager simulation time browse button.
01:49
This time setting can now be used for any steady state analysis.
Video transcript
00:04
With info Water pro,
00:05
you can run steady state simulations on a new model project
00:09
to take a snapshot in time before going more in depth.
00:14
Specifically steady state simulations capture the results for a
00:17
single time step with no variance in modeling outputs.
00:22
This allows you to see a snapshot in time of the system
00:25
which is helpful when you later perform in extended period simulation.
00:29
S
00:30
where you add in temporal variation to your model elements.
00:34
Some common examples of steady state simulations
00:37
are peak hour and firef flow scenarios.
00:41
These snapshots can provide information on demands,
00:44
pumping data and tank elevations
00:49
to begin double click the desired project dot APR file to open
00:54
Agis Pro.
00:56
Once the project starts,
00:57
click the info Water pro tab to open the info Water pro ribbon
01:02
in the project panel. Click initialize
01:07
in the model explorer switch to the operation tab.
01:11
The operation tab contains many modeling
01:13
parameters and other useful information,
01:17
expand simulation time and then double click base base simulation time
01:23
in the simulation time dialog box from the toolbar, click new
01:28
and then enter the new ID name as SS comma steady state
01:32
analysis.
01:34
Click OK.
01:36
Verify that the steady state checkbox is enabled and then click. OK. Again
01:42
note that you can also open the simulation time
01:44
dialogue from the run manager simulation time browse button.
01:49
This time setting can now be used for any steady state analysis.
With InfoWater Pro, you can run steady state simulations on a new model project to take a snapshot in time before going more in-depth. Steady state simulations capture the results for a single timestep with no variance in modeling inputs and are useful for simulating peak hour and fireflow scenarios.


Note that you can also open the Simulation Time dialog from the Run Manager, Simulation Time Browse button.


The new steady state simulation now appears in the Model Explorer under Simulation Time.

How to buy
Privacy | Do not sell or share my personal information | Cookie preferences | Report noncompliance | Terms of use | Legal | © 2025 Autodesk Inc. All rights reserved
Sign in for the best experience
Save your progress
Get access to courses
Receive personalized recommendations
May we collect and use your data?
Learn more about the Third Party Services we use and our Privacy Statement.May we collect and use your data to tailor your experience?
Explore the benefits of a customized experience by managing your privacy settings for this site or visit our Privacy Statement to learn more about your options.