• InfoWater Pro

Importing features from the GIS Gateway

Use the GIS Gateway to exchange data from a GIS database to InfoWater Pro by creating GIS Exchange Clusters for importing specific features, and then importing the features.


Tutorial resources

These downloadable resources will be used to complete this tutorial:


00:04

Info

00:05

Water Pro offers a variety of data exchange tools

00:08

to address most challenges related to data formats.

00:11

One of these tools is the GIS gateway.

00:15

It provides a powerful way to manage data exchange settings to allow you to

00:18

quickly load and save data between info Water pro and GIS data sources.

00:25

The data exchange settings are set up once and can be reused in the future

00:30

to create a GIS exchange cluster. First start a new ARC

00:34

GS pro blank template map project

00:43

from the ARC

00:43

GSS pro toolbar layer section. Click add data

00:50

for this example. Double click the dot GDB sample file,

00:57

select the water mains feature class and click OK

01:02

on the info water pro ribbon

01:04

in the project panel, click initialize

01:10

for the spatial reference,

01:11

make sure that same as active map is selected and then click OK,

01:17

click preferences

01:19

and in the operation settings tab make

01:21

sure that auto length calculation is selected.

01:25

You can access the GIS gateway on the info Water Pro ribbon. In the edit panel,

01:32

the GIS gateway stores information in exchange clusters,

01:36

exchange clusters are sets of data exchange parameters

01:39

that control how data is loaded from G

01:41

S data to info Water pro

01:44

each cluster is unique to a data source and element type.

01:48

For example,

01:49

if you want to import two shape files for pipes and one shape file for tanks,

01:54

you need to create three exchange clusters.

01:57

Click add to create a new cluster for a single

02:00

data source that you want to bring into info Water pro

02:04

in the identification window.

02:05

Add the cluster ID using the naming convention of ID with no spaces,

02:10

a comma and then your description which can have spaces

02:14

for example, pipes, comma new pipe import.

02:18

Then click OK

02:20

in the GIS exchange cluster window next to GIS data source.

02:24

Click more to open the file browser.

02:28

Locate the input source shape file that you want to import.

02:31

Select it

02:32

and then click OK.

02:34

In this case, locate the dot GDB sample file,

02:37

select the water mains feature class and click OK.

02:43

The feature class

02:44

table field is automatically filled in with the

02:46

specific feature class or table within the selected database

02:51

in the type.

02:52

Drop down,

02:52

select the info water pro database tables to be

02:55

used by the GIS exchange cluster such as pipe tables

02:59

on the tabular joint tab use the G I S ID mapping field to denote which

03:04

field in the G I S layer is to be matched with the respective ID field.

03:08

In the selected info Water pro data table.

03:11

For this example, select F C underscore ID

03:17

in the field mapping tab you map corresponding fields

03:19

to each other prior to performing the GIS exchange.

03:24

This ensures that the GIS data you are importing is associated

03:27

to the proper info water pro field in the table.

03:31

Select install underscore Yr under GIS data fields and pipe dash right

03:37

Aero Yr underscore S T

03:40

under network slash GIS

03:42

data field mapping

03:43

and click the arrow icon.

03:45

Repeat this step to map, comment to pipe dash right

03:49

arrow descript,

03:51

click the double arrow icon to auto map the remaining GIS fields.

03:55

All fields in the G I S with the same name and data type are automatically mapped.

04:01

Use the ware clause field to create a script to query the specific items to import.

04:06

If you leave this field blank, then everything in the data source is imported.

04:11

For this example, use status equals one.

04:14

This clause restricts the import to only pipes that are

04:17

existing in the system as identified using the field status.

04:22

Click OK. And then load to open the load data from GIS layer or table window.

04:29

Select the exchange cluster to load.

04:31

In this case, pipes, new pipe import and click load.

04:36

The GIS

04:36

data sources are loaded based on the

04:38

selections settings and filters that you entered.

04:43

Close the G I S gateway and use the select tool on the info water pro ribbon

04:48

edit panel to select some of the pipes you just added to the model.

04:53

You can follow these same steps to use the GIS gateway to import other

04:57

GIS data sources from the same GEO database file such as valves and tanks.

Video transcript

00:04

Info

00:05

Water Pro offers a variety of data exchange tools

00:08

to address most challenges related to data formats.

00:11

One of these tools is the GIS gateway.

00:15

It provides a powerful way to manage data exchange settings to allow you to

00:18

quickly load and save data between info Water pro and GIS data sources.

00:25

The data exchange settings are set up once and can be reused in the future

00:30

to create a GIS exchange cluster. First start a new ARC

00:34

GS pro blank template map project

00:43

from the ARC

00:43

GSS pro toolbar layer section. Click add data

00:50

for this example. Double click the dot GDB sample file,

00:57

select the water mains feature class and click OK

01:02

on the info water pro ribbon

01:04

in the project panel, click initialize

01:10

for the spatial reference,

01:11

make sure that same as active map is selected and then click OK,

01:17

click preferences

01:19

and in the operation settings tab make

01:21

sure that auto length calculation is selected.

01:25

You can access the GIS gateway on the info Water Pro ribbon. In the edit panel,

01:32

the GIS gateway stores information in exchange clusters,

01:36

exchange clusters are sets of data exchange parameters

01:39

that control how data is loaded from G

01:41

S data to info Water pro

01:44

each cluster is unique to a data source and element type.

01:48

For example,

01:49

if you want to import two shape files for pipes and one shape file for tanks,

01:54

you need to create three exchange clusters.

01:57

Click add to create a new cluster for a single

02:00

data source that you want to bring into info Water pro

02:04

in the identification window.

02:05

Add the cluster ID using the naming convention of ID with no spaces,

02:10

a comma and then your description which can have spaces

02:14

for example, pipes, comma new pipe import.

02:18

Then click OK

02:20

in the GIS exchange cluster window next to GIS data source.

02:24

Click more to open the file browser.

02:28

Locate the input source shape file that you want to import.

02:31

Select it

02:32

and then click OK.

02:34

In this case, locate the dot GDB sample file,

02:37

select the water mains feature class and click OK.

02:43

The feature class

02:44

table field is automatically filled in with the

02:46

specific feature class or table within the selected database

02:51

in the type.

02:52

Drop down,

02:52

select the info water pro database tables to be

02:55

used by the GIS exchange cluster such as pipe tables

02:59

on the tabular joint tab use the G I S ID mapping field to denote which

03:04

field in the G I S layer is to be matched with the respective ID field.

03:08

In the selected info Water pro data table.

03:11

For this example, select F C underscore ID

03:17

in the field mapping tab you map corresponding fields

03:19

to each other prior to performing the GIS exchange.

03:24

This ensures that the GIS data you are importing is associated

03:27

to the proper info water pro field in the table.

03:31

Select install underscore Yr under GIS data fields and pipe dash right

03:37

Aero Yr underscore S T

03:40

under network slash GIS

03:42

data field mapping

03:43

and click the arrow icon.

03:45

Repeat this step to map, comment to pipe dash right

03:49

arrow descript,

03:51

click the double arrow icon to auto map the remaining GIS fields.

03:55

All fields in the G I S with the same name and data type are automatically mapped.

04:01

Use the ware clause field to create a script to query the specific items to import.

04:06

If you leave this field blank, then everything in the data source is imported.

04:11

For this example, use status equals one.

04:14

This clause restricts the import to only pipes that are

04:17

existing in the system as identified using the field status.

04:22

Click OK. And then load to open the load data from GIS layer or table window.

04:29

Select the exchange cluster to load.

04:31

In this case, pipes, new pipe import and click load.

04:36

The GIS

04:36

data sources are loaded based on the

04:38

selections settings and filters that you entered.

04:43

Close the G I S gateway and use the select tool on the info water pro ribbon

04:48

edit panel to select some of the pipes you just added to the model.

04:53

You can follow these same steps to use the GIS gateway to import other

04:57

GIS data sources from the same GEO database file such as valves and tanks.

Step-by-step:

InfoWater Pro offers a variety of data exchange tools to address most challenges related to data formats. One of these tools is the GIS Gateway. It provides a powerful way to manage data exchange settings to allow you to quickly load and save data between InfoWater Pro and GIS data sources. The data exchange settings are set up once and can be re-used in the future.

  1. To create a GIS exchange cluster, first, start a new ArcGIS Pro Blank Template Map project.
    The ARCGIS Pro Blank Templates start menu, after Map is selected, with the Create a New Project dialog box in the foreground
  2. In the Create a New Project dialog box, name the new project; in this case, “Training_Model”.
  3. In the New Project Location dialog box, browse to and select the folder where you want to save the project, such as “Training” in this example, and click OK.
  4. From the ArcGIS Pro toolbar, Layer panel, click Add Data.
  5. In the Add Data dialog box, double-click the .gdb sample file.
  6. Select the Watermains feature class.
  7. Click OK.
    The Add Data dialog box with Watermains selected in the .gdb sample file location
  8. On the ribbon, InfoWater Pro tab, Project panel, click Initialize to establish the links between the ArcGIS Pro Document file and the InfoWater Pro database tables.
    The InfoWater Pro tab highlighted on the ribbon with Initialize highlighted in the Project panel
  9. In the Create New InfoWater Project dialog box, for the spatial reference, make sure that Same as active map is selected.
  10. Click OK.
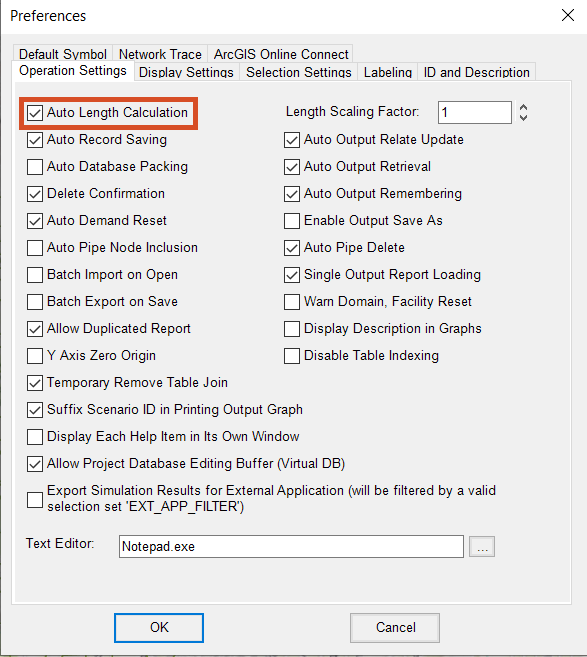
  11. In the InfoWater Pro ribbon, Project panel, click Preferences.
  12. In the Preferences dialog box, Operation Settings tab, select Auto Length Calculation.
    The InfoWater Pro Preferences dialog box, Operation Settings tab, with Auto Length Calculation selected and highlighted

You can now access the GIS Gateway, which stores information in exchange clusters. Exchange clusters are sets of data-exchange parameters that control how data is loaded from GIS data to InfoWater Pro. Each cluster is unique to a data source and element type. For example, if you want to import two shapefiles for pipes and one shapefile for tanks, you need to create three exchange clusters.

  1. On the ribbon, InfoWater Pro tab, in the Exchange panel, click GIS Gateway.
  2. In the GIS Gateway dialog box, under GIS Exchange Cluster, click Add to create a new cluster for a single data source that you want to bring into InfoWater Pro.
  3. In the Identification popup, add the cluster ID, using the naming convention of ID, with no spaces, a comma, and then your description, which can have spaces. For example, “PIPES, New Pipe Import”.
  4. Click OK.
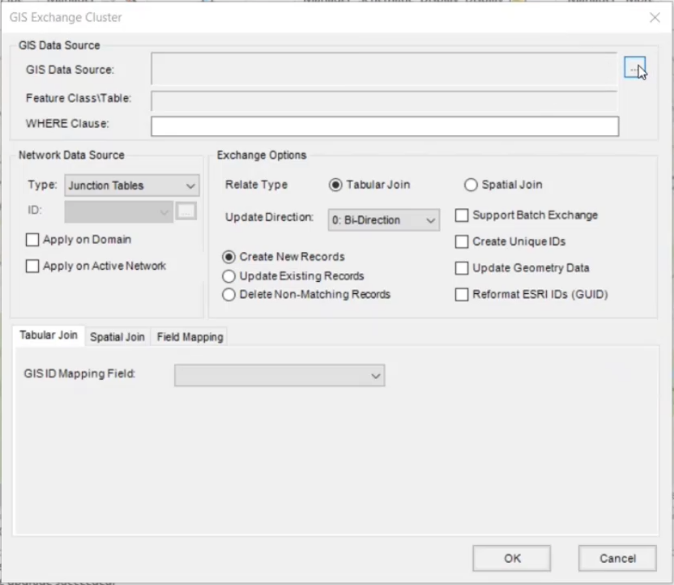
  5. In the GIS Exchange Cluster dialog box, next to GIS Data Source, click More () to open the file browser.
    GIS Exchange Cluster dialog box, with the GIS Data Source More option highlighted
  6. In the Open dialog box, locate the .gdb sample file.
  7. Select the Watermains feature class.
  8. Click OK.

In the GIS Data Source group, the Feature Class\Table field is automatically filled in with the specific feature class or table within the selected database.

  1. Expand the Type drop-down and select the InfoWater Pro database tables to be used by the GIS Exchange Cluster, such as Pipe Tables.
  2. Click the Tabular Join tab.
  3. Use the GIS ID Mapping Field to denote which field in the GIS layer is to be matched with the respective ID field in the selected InfoWater Pro data table. For this example, select FAC_ID.
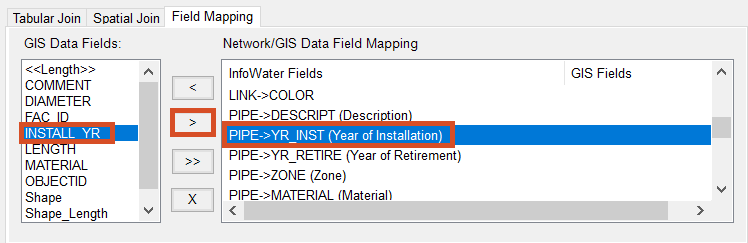
  4. Click the Field Mapping tab.

In the Field Mapping tab, you map corresponding fields to each other prior to performing the GIS Exchange. This ensures that the GIS data you are importing is associated to the proper InfoWater Pro field in the table.

  1. Under GIS Data Fields, select INSTALL_YR.
  2. Under Network/GIS Data Field Mapping, select PIPE->YR_INST.
  3. Click the arrow (>) icon.
    The Field Mapping tab of the GIS Exchange Cluster window with mapped items highlighted
  4. Repeat steps 25 – 27 to map COMMENT to PIPE->DESCRIPT.
  5. Click the double arrow (>>) icon to auto-map the remaining GIS fields.
    Field Mapping tab of the GIS Exchange Cluster window with auto-map icon highlighted

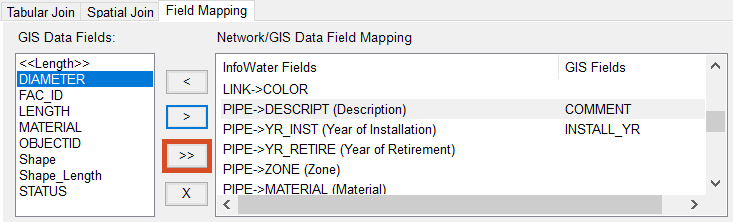
All fields in the GIS with the same name and data type are automatically mapped.

Use the WHERE Clause field to create a script to query the specific items to import. If you leave this field blank, then everything in the data source is imported.

  1. Enter a WHERE Clause of STATUS = 1. This clause restricts the import to only pipes that are existing in the system, as identified using the field STATUS.
  2. Click OK.
  3. Back in the GIS Gateway, click Load.
  4. In the Load Data from GIS Layer or Table dialog box, select the exchange cluster to load (in this case, PIPES, New Pipe Import).
  5. Click Load.
    The Load Data from GIS Layer or Table dialog box, with the load results reported in the Message Board

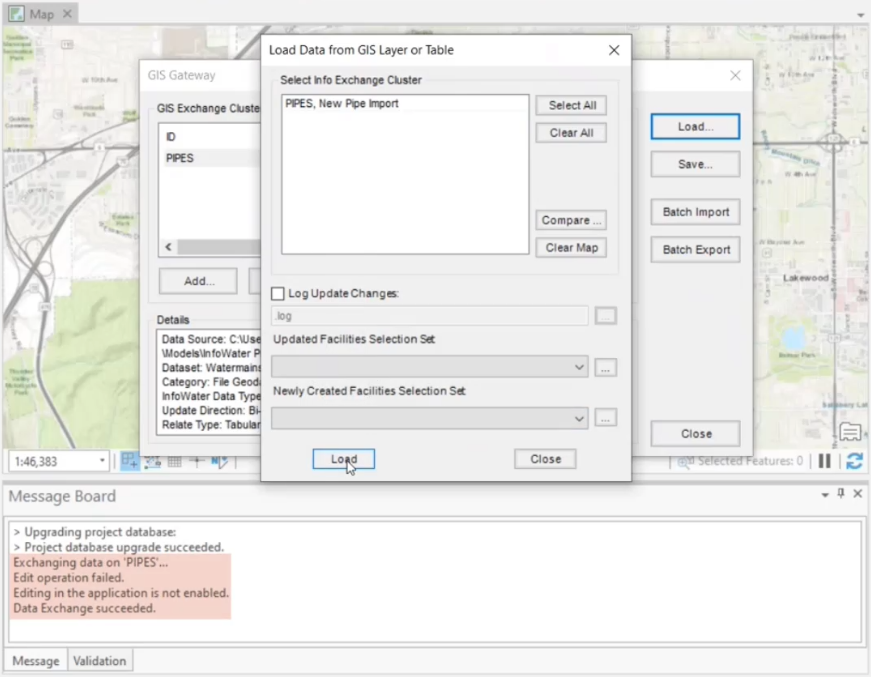
The GIS data sources are loaded, based on the selections, settings, and filters that you entered.

  1. Close the GIS Gateway.
  2. On the InfoWater Pro ribbon, Edit panel, use the Select tool to select some of the pipes you just added to the model.

Follow these same steps to use the GIS Gateway to import other GIS data sources from the same geodatabase file, such as valves and tanks.

Was this information helpful?