& Construction

Integrated BIM tools, including Revit, AutoCAD, and Civil 3D
& Manufacturing

Professional CAD/CAM tools built on Inventor and AutoCAD

Integrated BIM tools, including Revit, AutoCAD, and Civil 3D

Professional CAD/CAM tools built on Inventor and AutoCAD
Define database query sets for scenarios.
Type:
Tutorial
Length:
8 min.
Tutorial resources
These downloadable resources will be used to complete this tutorial:
Transcript
00:03
Once you have set up scenarios with different conditions,
00:06
you can define query set definitions for the scenarios.
00:10
In info Water pro,
00:12
you can select network components and related data by
00:15
creating logical query statements with the DB query feature
00:20
to begin
00:21
double click the desired project dot APR file to open
00:25
Agis Pro.
00:27
Once the project starts,
00:28
click the info water pro tab to open the info Water Pro ribbon
00:33
in the project panel, click initialize
00:37
for this example, the existing and 2030 scenarios were previously created.
00:43
You can now define scenario query set definitions for them.
00:47
Also, since this query will involve pipes,
00:49
a helpful preference to enable before starting.
00:51
This exercise is auto pipe node inclusion
00:55
on the info water pro ribbon.
00:57
In the project panel, click preferences
01:01
on the operation settings tab enable auto pipe node inclusion
01:05
and then click OK.
01:08
In the model explorer on the operation tab, right, click query set and select new
01:14
in the query set identification dialogue.
01:17
Assign a query set id of F AC underscore existing
01:21
and then click OK.
01:25
In the DB query set window,
01:27
click browse beside the DB query field to open the DB query window
01:32
in the DB query window, click new and then in the pop-up,
01:36
assign a new id of pipes underscore existing
01:40
click, OK.
01:42
In the select element type dialogue, select pipe as the element type and then click,
01:47
OK.
01:49
Back in the DB query dialogue, click the query builder icon
01:55
in the query builder, click the pipe tab
01:58
and in the data field box, select pipe dash right,
02:01
Aero Y R underscore S T year of installation,
02:07
select less than equals as the operator
02:11
enter 2020 in the text field and click add to write the SQL
02:15
statement into the query statement box.
02:19
This query selects all existing pipes and will
02:21
define the active facilities in the existing scenarios.
02:26
Click validate to ensure that the query statement is valid.
02:30
Click OK, to close the validation pop-up and OK again to close the query builder.
02:37
Since you enabled the auto pipe node inclusion preference,
02:40
you only need to create this query for pipes.
02:43
The nodes that are connected to the selected pipes will automatically be selected
02:49
back in the DB query window, select the pipe's existing query
02:53
and then in the toolbar click clone,
02:56
assign a new id of pipes underscore 2030
02:59
and then click, OK.
03:03
With pipes 2030 selected change only the year in the query statement box to 2030.
03:12
Select the pipe's existing query again and click. OK.
03:17
This automatically assigns the pipe's existing database query to the fac
03:21
existing query set
03:25
in the DB query set window, click new,
03:27
assign a new id of F C underscore 2030
03:31
and click. OK.
03:34
With fac
03:36
expand the DB query dropdown and select pipes 2030
03:40
to apply the 2030 query to this query set
03:44
click, OK to commit the changes and close the DB query set window.
03:50
The scenario query set definitions are now set up and ready to use.
Video transcript
00:03
Once you have set up scenarios with different conditions,
00:06
you can define query set definitions for the scenarios.
00:10
In info Water pro,
00:12
you can select network components and related data by
00:15
creating logical query statements with the DB query feature
00:20
to begin
00:21
double click the desired project dot APR file to open
00:25
Agis Pro.
00:27
Once the project starts,
00:28
click the info water pro tab to open the info Water Pro ribbon
00:33
in the project panel, click initialize
00:37
for this example, the existing and 2030 scenarios were previously created.
00:43
You can now define scenario query set definitions for them.
00:47
Also, since this query will involve pipes,
00:49
a helpful preference to enable before starting.
00:51
This exercise is auto pipe node inclusion
00:55
on the info water pro ribbon.
00:57
In the project panel, click preferences
01:01
on the operation settings tab enable auto pipe node inclusion
01:05
and then click OK.
01:08
In the model explorer on the operation tab, right, click query set and select new
01:14
in the query set identification dialogue.
01:17
Assign a query set id of F AC underscore existing
01:21
and then click OK.
01:25
In the DB query set window,
01:27
click browse beside the DB query field to open the DB query window
01:32
in the DB query window, click new and then in the pop-up,
01:36
assign a new id of pipes underscore existing
01:40
click, OK.
01:42
In the select element type dialogue, select pipe as the element type and then click,
01:47
OK.
01:49
Back in the DB query dialogue, click the query builder icon
01:55
in the query builder, click the pipe tab
01:58
and in the data field box, select pipe dash right,
02:01
Aero Y R underscore S T year of installation,
02:07
select less than equals as the operator
02:11
enter 2020 in the text field and click add to write the SQL
02:15
statement into the query statement box.
02:19
This query selects all existing pipes and will
02:21
define the active facilities in the existing scenarios.
02:26
Click validate to ensure that the query statement is valid.
02:30
Click OK, to close the validation pop-up and OK again to close the query builder.
02:37
Since you enabled the auto pipe node inclusion preference,
02:40
you only need to create this query for pipes.
02:43
The nodes that are connected to the selected pipes will automatically be selected
02:49
back in the DB query window, select the pipe's existing query
02:53
and then in the toolbar click clone,
02:56
assign a new id of pipes underscore 2030
02:59
and then click, OK.
03:03
With pipes 2030 selected change only the year in the query statement box to 2030.
03:12
Select the pipe's existing query again and click. OK.
03:17
This automatically assigns the pipe's existing database query to the fac
03:21
existing query set
03:25
in the DB query set window, click new,
03:27
assign a new id of F C underscore 2030
03:31
and click. OK.
03:34
With fac
03:36
expand the DB query dropdown and select pipes 2030
03:40
to apply the 2030 query to this query set
03:44
click, OK to commit the changes and close the DB query set window.
03:50
The scenario query set definitions are now set up and ready to use.
Once you have set up scenarios with different conditions, you can define query set definitions for the scenarios. In InfoWater Pro, you can select network components and related data by creating logical query statements with the DB Query feature.
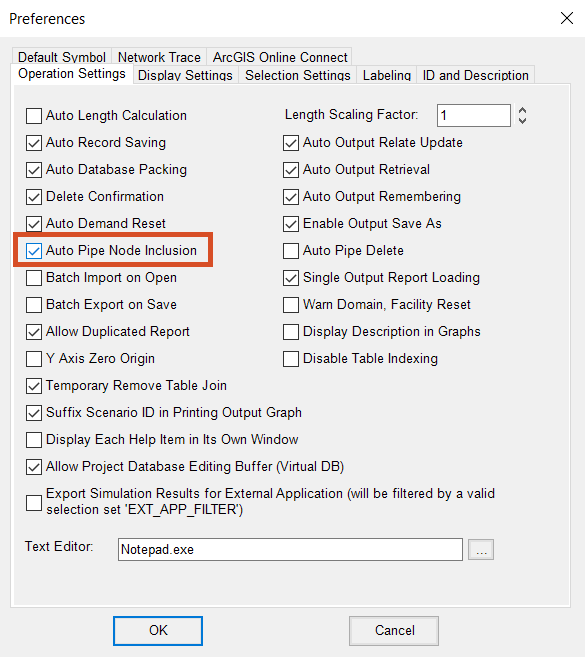
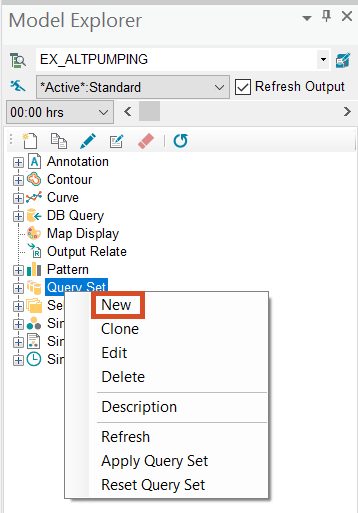
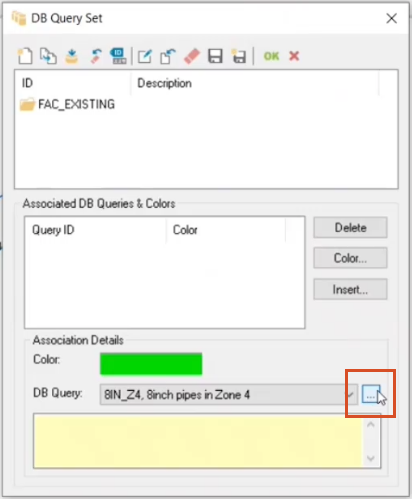
For this tutorial, the EXISTING and 2030 scenarios were previously created. To define scenario query set definitions for them:

This query selects all existing pipes and will define the active facilities in the EXISTING scenarios.
IMPORTANT: Since you enabled the Auto Pipe Node Inclusion preference, you only need to create this query for pipes. The nodes that are connected to the selected pipes will automatically be selected.
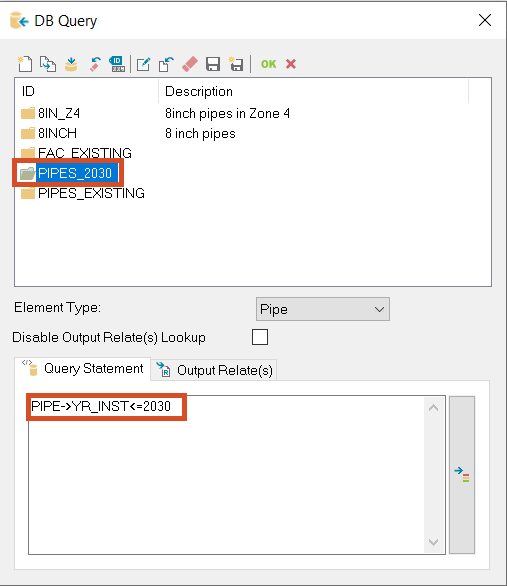
This automatically assigns the PIPES_EXISTING database query to the FAC_EXISTING query set.
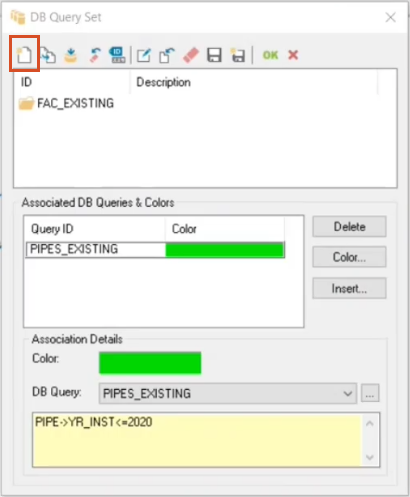
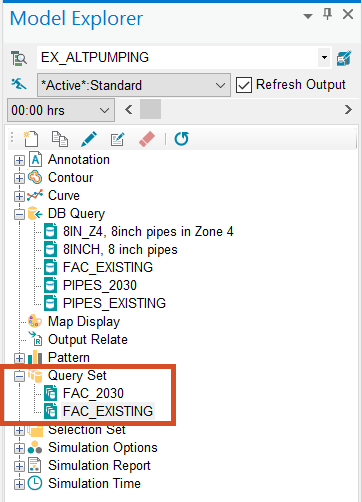
The scenario query set definitions are now set up and ready to use:
How to buy
Privacy | Do not sell or share my personal information | Cookie preferences | Report noncompliance | Terms of use | Legal | © 2025 Autodesk Inc. All rights reserved
Sign in for the best experience
Save your progress
Get access to courses
Receive personalized recommendations
May we collect and use your data?
Learn more about the Third Party Services we use and our Privacy Statement.May we collect and use your data to tailor your experience?
Explore the benefits of a customized experience by managing your privacy settings for this site or visit our Privacy Statement to learn more about your options.